Sunday, July 31, 2016

more water color fun

It’s been fun to “attend” the online card class for intermediates.  I’ve never been disappointed in the classes i take from them.  I like that you can go back and look at the videos and training any time.  I always learn something new when i go back and watch again.  I signed up for this class way back in February I think but haven’t really had much time to watch the videos.  It was oh so much fun to learn i could make a rose.  Now, i can’t even draw a stick guy so for me to make something that even looks like a flower is a huge accomplishment.  And this didn’t even take that long.  I made several cards like this with all my practice roses.  There wasn’t even one that was so bad that i had to toss it.  Now that’s a real acheivement.  

Then I tried my hand at a little ombre water coloring a piece that i made into a tag for the flamingos.  That needs more practice as you can’t see the differing colors, they kind of all ran into one color.  It’s still a pretty background though, so let’s use it. IMG_8549 (708x800)IMG_8548 (703x800)

IMG_8550 (634x800)

Friday, July 29, 2016

OMW catz! #687, 688, 689

If i ever find myself living on my own, i will get a cat…and then again, maybe not, they are so very shedding creatures.  But they are such good companions that don’t have to be walked or let out at certain times.  They can take care of themselves, kind of, for a couple of days anyway. 

In the meantime i shall smile my time away with these Crazy Cats from Tim Holtz.  Oh my word, the expressions on their faces just crack me up.

This is going out to one of my cat loving friends.  I have lots of them, cat loving friends, that is.  We must all be the same kind of people when i think how many of us are cat lovers.  This just makes me chuckle.  Going to make a couple of more of them.  too fun.  Entering into Simon’s Wednesday Anything Goes challenge and also Word Art Wednesday.


IMG_8542 (737x800)

Thursday, July 28, 2016

have you heard the news #685-686

You would have to be living under a rock to not have seen It’s National Ice Cream Month.  It’s been on Face Book, in the papers, on the ice cream stand signs, on cards….let’s see anything else?  Well this is the first time I’ve ever heard of it and I suppose it’s been going on ever since people learned about freezers.  Anyhoo, thought i would throw my hat in the arena with all the rest of the ice screamed crazy people,  you know, I scream, You scream, We all scream for ice cream mantra.  Hitting that Simon Says Wednesday Challenge and also MFT Sketch Challenge #291.
taped off the lines on the back ground and used distress inks to make my stripes.
IMG_8541 (588x800)

rainy day blues Stamps 683-684

it’s rained pretty much 24 hours now.  we were lucky to only get almost two inches of rain and north of us just nine miles they got a whopping five inches.  My word!  I think we need to take a drive and see how all the streams are running.  It’s been fun to enjoy playing in the craft room and here’s the blue blue card i made for Inspiration Challenge on Splitcoast Stampers.  Dug out some of those old solid flowers and two step stamping now they’re calling it layering stamping.  I masked off the flowers and sponges with blueprint distress ink and splattered.  Just thought the vellum banner was the perfect touch. Entering this into Simon's Wednesday Anything goes challenge.
IMG_8538 (648x800)

textured bliss stamp #682

for Simon’s Monday Texture Challenge i used my textured paper and embossed it with a stencil.  The layout is a MFT blueprint 3 dies and sketch.  I do get a lot of use out of all my blueprint pieces.  The image is from Northwoods Rubber Stamps and colored with Tombows.  There is a learning curve with any new medium a person tries.  i hope to get better at using these markers.  I used a specialty water color paper this time.  The paper ribbon and bow are also textured paper.
IMG_8537 (668x800)

Single Rose

Simon’s Monday Challenge is to add texture.  I’ve been wanting to use this stencil with some pearlized embossing paste and it was just the little push i needed.  It turned out so pretty.  I love doing pasted stenciling.  The old rose has been in my stash ten or more years.  It’s still a classic, it still stamps beutifully and i love all the different colors i can make the flower.  Sponged lightly with picked raspberry distress ink.

IMG_8536 (664x800)


Monday, July 25, 2016

Sketch Challenge #290

Since i was poking around on the MFT blog I thought it would be fun to do a sketch challenge again.  All the solid flower stamps seem to be the “in” thing again from what i’m seeing on various blogs.  I’ve never been much of a solid flower type of stamper but all those blogs kind of make you want to try.  All those little leaves and petals on the new sets scare me.  Thought i would try my hand with these die cuts from Blueprints 5.  The colors are a bit off in the photo.  In real life they look fine and a bit more muted.  It was fun to play with this and try something new for me. 

Entered into Wednesday MFT Sketch Challenge 290

IMG_8535 (674x800)

sometimes….

Sometimes it’s just good to create.  It was fun to make this card with my blueprints 4 from MFT.  Everything on this card is MFT.  I seem to be collecting more and more from them.  This was a challenge put out by MFT to use ten items on your card.  Whatever that meant to the person creating.  The contest ended on the 21st but i needed some inspiration and jumped in.  I used TEN die cuts.  The flower is from Wildflowers set.  I rather like how it turned out.

IMG_8534 (687x800)

Sunday, July 24, 2016

When is a tag not a tag?

IMG_8529 (645x800)Grab our badge:

here’s the used to be tag that i posted the other day as my first generation of stamping with distress inks.  It’s in my blood, i cannot throw things away.  So while this was simple to put together there is a lot that happened here.  The edges of the focal image panel are rounded. The stars are embossed with antique gold powder.  the background is stenciled, the little brown strip that looks sewn is pierced and faux stitched.  the rick rack is tinted with distress ink and the under panel is ripped and distressed edges.  It was fun to put all these elements together.  I am entering this into Word Art Wednesday #240-#241 and Simon Says Monday Challenge nautical;  after all, waaaay back in the olden days all sailing was done by the sun,  moon and stars.  

kind of like flowers Stamp #681

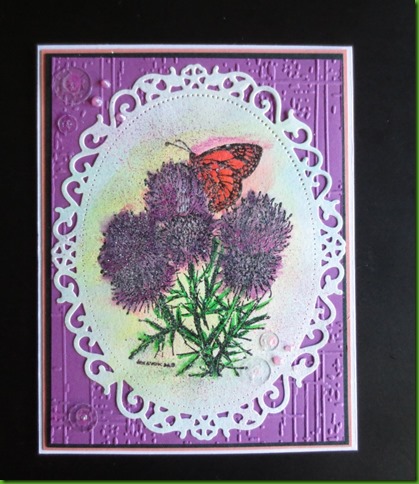
as we drive along wisconsin highways it’s so pretty to see all the weeds wild flowers growing along the ditches and medians.  so many colors, white, purple, yellow, blue, pink.  Thistles, cone flowers, yarrow in a variety of colors, daisys, brown eyed susans,  it just screams summer which i love to hear!  I’m not sure if this image is taylored expressions or northwoods rubber stamps but i couldn’t stop my hand from reaching for it when i shopped at Door County Rubber Stamps.  It got a bit darker than i wanted it too but i’m still trying to get a feel for the Tombow markers.  they are quite different than the stampin up markers i have used for years (they are drying out after ten years and only some of them but they were all my faves)
I tried out my spritzer tool also and i like the fine mist of color it sprays.  i should grab that more often.  some impressions art glitter attached itself to the thistles and i like the bit of sparkle.  Hope you like it as well.  Likely this will be a get well or thinking of you.  Thanks for coming by.  Entering into Word Art Wednesday #240 &#241  even though i have no word art on the front.  SmileRed heart
IMG_8531 (692x800)

gull dang it stamp #680

tee-hee  these gulls are just so fun.  i decided it was time to use up the paper that I bought from Door County Rubber Stamps two years ago.  ahem…i couldn’t find it, and no wonder, somehow i put it in the Christmas stuff.  the nautical themed papers from echo park went so well with this image.  guess i’m lovin’ that anchor die from whimsy also.  water colored with tombow markers.
entering in things with wings wednesday challenge at Simon Says.
IMG_8532 (800x583) (2)

Summer masculine birthday

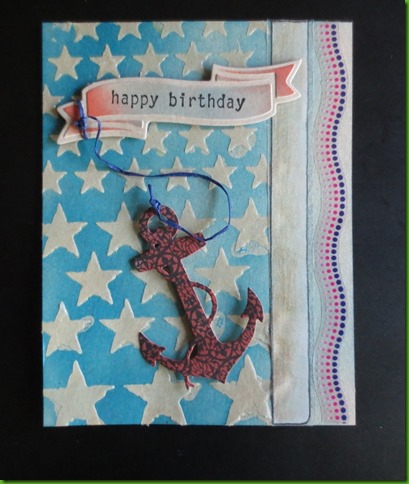
die cuts can be so fun to play with.  i’m so glad for who ever turned me on to them.  Thought i would try a little emboss resist with some kraft paper.  I saw some pre-embossed kraft at Hobby Lobby but knew i would never use a full pack of the stuff.  why not do my own in what ever pattern suits me?  It was stars for this one.  Tim Holtz stencil.  I used transclucent embossing paste and sponged with salty ocean distress ink.  going from light to dark.  added some stickers (use your stuff, ya know)  the anchor from Whimsey is cut out of a piece of halloween paper and sponged over.  sentiment banner is from Spellbinders.  one of my faves.  love to do the embossing thing, leave the die in place and sponge over it.  it’s a great look.

Entering this into Simon’s Monday Nautical challenge if the linkyz is still open, that is. IMG_8530 (675x800)

Friday, July 22, 2016

Week 8 Tim Holtz Class

It’s called smudge stamping, it doesn’t really make sense until you do it.  After stamping 2nd generation you smudge it with a blending sponge.  I love how it turned out with these very old SU stamps.  I used Word Art Wednesday’s scripture verse.  I’m so glad they put these together for us.  I sponged the stars with fossilized amber and then quickly embossed them with Ranger Antique gold.  I used MFT star die from one of the BluePrints and used heat and stick embossing powder with rock candy and the same antique gold embossing powder.  This will be an entry for the class.  The tag is the first generation of stamping with distress inks.  I love the soft look of the smudged ink.

IMG_8527 (668x800)IMG_8528 (800x600)

NEW stamps! how fun #679

A couple of weeks ago Sarah and I stopped in to see Oscar at Door County Rubber Stamps.  Her stamps are so cute.  She has been in business at the same location for 27 years.  You can visit her on-line store by clicking on the link on my side bar.  She’s the best!

Here is just one of the fun stamps I purchased.  Okay, I easily spent over $100 at her fun store.  I am entering this into the Simon Says Monday Challenge for Nautical.  I should really pull out all my nautical stamps from Door County which is on Lake Michigan and so there are lots of nautical things in that area and Oscar captures the Door County life in her stamps.  But, I digress.  HERE is the fun creation i came up with.  Senitment is from Door County Stamps also.  Water colored panel and frame die cut with Simon’s dies.  ~~Also entered into Word Art Wednesday #240-241

IMG_8525 (800x610)

Saturday, July 16, 2016

background

Print

i think i purchased this MFT stamp set because of one of the sentiments on it.  I wasn’t sure what i was going to do with all these silhouette animals but for some reason i wanted some silhouette stamps.  i chose pigs, cows, and horses???? What was i thinking. Anyway our instructor for the fifth day of camp told us to make a back ground with stamps.  Hand lettered sentiment banner because i wanted that sentiment.  it is what it is, hey, it’s hand made, i couldn’t get the lettering straight but whoever receives this isn’t going to care a bit.  This completes my five days of classes this week and i would love to win that $150 gift certificate!!

IMG_8524 (698x800)

Magical Masking MFT


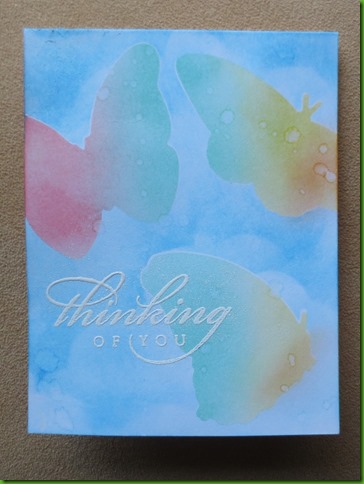
IMG_8522 (600x800)it tooPrintk me a long time to think it was worth my money to invest in masking paper.  i ordered the inkadinka doo brand awhile back when i won a gift certificate from Simon Says.  It is well worth the dollars spent as it works really really well.  way better than any of my attempts at temporary gluing down thin pieces of paper for masking then having to remove the adhesive from the surface of the card.

For this beauty, i first cut a piece of masking paper to A2 size.  Then i laid my MFT butterfly dies on the white side and ran through my die cut.  I took the A2 sized piece and lay it down on my card base lining it up perfectly.  Next i pulled out fossilized amber, cracked pistachio and fossilized coral and sponged over the butterfly holes that i had made.  Then i removed the A2 piece and went back and used the masks of the butterflies i had cut out.  Grabbed my handy cloud stencil and some salty ocean distress ink and made a beautiful soft floating cloud background.  It just look like it needed a white embossed sentiment.   This is being entered into day 4 of MFT summer camp and also Simon Says Wednesday challenge, create a scene.

Inlaid Giraffe


Print

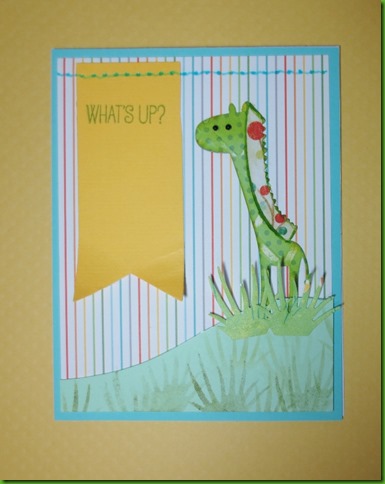
i think i may have done inlaid before but not really sure about that.  It was fun to try it with this sweet little giraffe from the MFT jungle kit.  I love the papers in this set. I used a scrap to cut the giraffe out and lay him into the space I had die cut for him to rest in.  Faux stitching of course!  I stenciled the grass through the cut out of the grassy die that comes in the kit and used the little sprouts for some dimension.

Entering into Simon’s Create a Scene Wednesday and also the class gallery for day 3 of this week.

IMG_8521 (635x800)

Coloring on Kraft Stamps#672-673-674-675-676-677-678

PrintKraft and me….hmmmm…now THAT’S a challenge for sure.  Okay, I will give it a shot and see what i come up with.  I do have some of those Prisma Pencils and harldy use them.  Time to go dig them out.   I’ll be back later.  5:13 p.m. 

6:05 p.m.  I never had a chance to use these little guys this past autumn.  It was fun to play with these cute little creatures.  I made a bit of a scene with them.  I hand drew the lane in as I didn’t want that fellow to look as if he were falling out of the sky.  I masked some of the images to put the little mouse behind a huge pile of leaves that i created with a couple of the stamps from this set.  so fun.  I didn’t have Prisma colors but Koh-i-noor.  I used gamsol and a blending stump with the colors.  I also grabbed my MFT sun rays stencil and used a bit of distress ink in Marigold and Coral for a bit of fading sun.

I am entering this into the class gallery and also into Simon’s Wednesday challenge to create a scene.

IMG_8520 (800x599)

MFT Summer School use foil

Pop on over to the MFT summer school classes.  They have some very cool short videos with challenges and the prize can be up to $150 for entering.  For Monday July 11th I created this foiled beauty with MFT dies.  I stuck the foiled paper to some sookwong adhesive paper and ran it through my Big Shot.  I wasn’t really sure where i was going with all this but we have a 50th anniversary gathering coming up for some friends and i wanted to create something gold and shiny.  He raises roses so i thought that was a good place to start.  I used tissue paper glued down with gel medium and then stuck the gold flowers on using only the ouline for one of them.  The sentiment banner is from spellbinders and i sponged it with Hickory smoke distress ink and gold emobssed it with a MFT sentiment stamp.  I raised the panel up with a piece of fun foam and also raised the sentiment banner.  A few touches of my Viva pearl pen and some sequins and ribbon and i am very happy with how this came together.  I am entering this into the class gallery.

Print


IMG_8519 (627x800)

Good-Bye Chili dog

IMG_2397

The sweetest pitbull ever.  Such a gentle spirit and funny dog.  He was very loving.  Always had to sit on your feet and get as close to you as possible.  If you were cooking he had to be between you and the stove, washing dishes, squeeze his way between you and the cupboards.  He ended up with fifteen years of life and we had to say good bye to him last week.  Our dauhter is devastated.  She and her hubby got him the first year they were married.  He used to sneak the bread and eat the whole loaf.  So many good memories.  We went over to her home a couple of days after his passing and planted some flowers in his memory.   Daisys for gentleness.  They should come up every year.  I made this card for them to help sooth the pain.  

IMG_8517 (652x800)

This memory box die is so pretty and fragile.  I used it as a stencil and sponged over a water colored background i had on my craft table.  Then it looked so pretty all colored I decided to use it as part of the card.  When I watered the flowers, Sarah had a watering can very similar to this and i thought it would be a nice touch to add to the card.  You can’t see it on the picture but there are water sprinkles dripping from the spout.  Hand lettered sentiment flag.

Thursday, July 7, 2016

grouping Stamp #471

time is getting pressed.  while i love being a care giver to my sweet niece it does take a lot of time.  We brought Laurel home with us last thursday and the transport van broke down.  We hope to get it back tomorrow.  It’s been a busy week.  Today was 5 1/2 hours filling out paper work to get assistance for her.  I need to do something craft related to reward my inner soul for that tedious project.  It will be worth it for her.  She so wishes for the use of her hands to come back.

i will post a host of cards all in this one post just so i have record of them and then i will remember that i actually did have some stamping time this week. 

IMG_8504 (739x800)IMG_8509IMG_8510IMG_8511IMG_8513IMG_8514IMG_8505

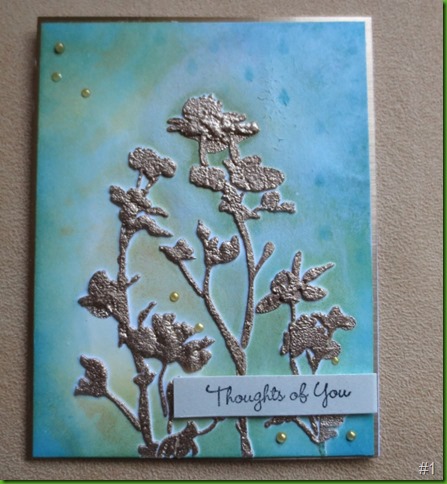
#1 Tim Holtz wild flower stencil.  Matte embossing paste covered with gold embossing powder.  Left to dry and then heat embossed.  Sponged with distress inks

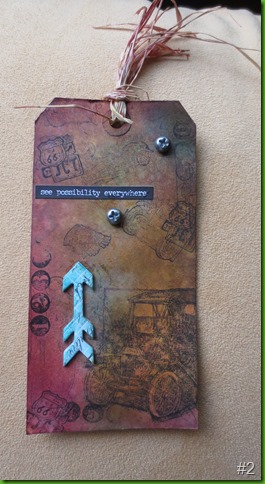
#2 Ranger Tag Using gold metallic distress ink for back ground

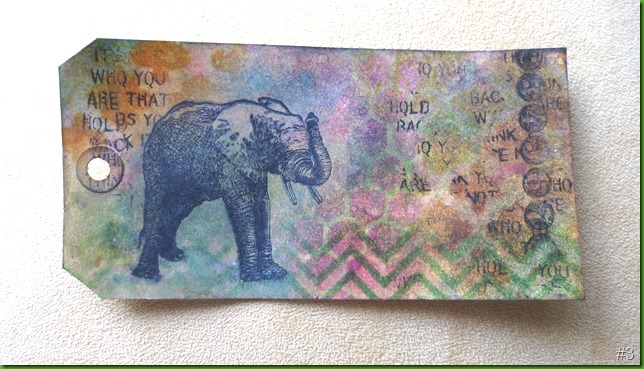
#3 Ranger Tag Stamping through stencils with sentiment stamps

#4 Ranger Tag Wet Embossing over distress inks through a stencil.  I used three distress paints to make the background layer.  Mustard Seed, Broken China and Tarnished brass.  I wet the tag and then diluted the paints to make a thin sparkly wash.  (entering into online card class day 5 technique)

#5  Using scraps on my desk

#6 Using a pre-colored piece to get it off the desk

#7 Also used scraps sitting on the corner of my craft table.  I love this creation.  I had made the cardboard back ground about a year ago.  I sponged with distress inks over the paste.  Sponged the die cuts with a bit of distress inks.  The sea horse was a die i used on chip board.  i used white distress paint and then sponged with a bit of ink.  I had the stitched frame die sitting in that same pile, i sponged it with broken china and pumice stone and popped it up with adhesive.  the finishing touches are done with Viva pearl pen and a couple of rhinestone bling.